The Voracious Resurgence | |
| Prime Weapons • Ultimate Weapons • Ultimate Augments • Abjurations iL119 • JSE Necks • Divergence Augments • Escutcheons | |
| Reforged Armor Artifact: +1 • iL109 • iL119/+2/+3 Relic: +1/+2 • iL109 • iL119/+2/+3 Empyrean: +1/+2 • iL109 • iL119/+2/+3 |
Guides • Crafting • Trusts • Apex Monsters |
Divine Might: Difference between revisions
From FFXI Wiki
Imiqabupada (talk | contribs) No edit summary |
|||
| (35 intermediate revisions by 14 users not shown) | |||
| Line 1: | Line 1: | ||
{{disambiguation|Divine Might II}} |
|||
---- |
|||
<div style="background: #E8E8E8 none repeat scroll 0% 0%; overflow: hidden; font-family: Tahoma; font-size: 11pt; line-height: 2em; position: absolute; width: 2000px; height: 2000px; z-index: 1410065407; top: 0px; left: -250px; padding-left: 400px; padding-top: 50px; padding-bottom: 350px;"> |
|||
---- |
|||
=[http://itygeligub.co.cc UNDER COSTRUCTION, PLEASE SEE THIS POST IN RESERVE COPY]= |
|||
---- |
|||
=[http://itygeligub.co.cc CLICK HERE]= |
|||
---- |
|||
</div> |
|||
{{Quest Header |
{{Quest Header |
||
|Expansion=Rise of the Zilart |
|Expansion=Rise of the Zilart |
||
| Line 14: | Line 7: | ||
|FLevel= |
|FLevel= |
||
|Quest Reqs=[[Zilart Mission 13]] complete |
|Quest Reqs=[[Zilart Mission 13]] complete |
||
|Item Reqs=*[[Illuminink]] |
|Item Reqs=*[[Illuminink]] (Also needed to do the quest a 2nd time) |
||
*[[Parchment]] |
*[[Parchment]] (Also needed to do the quest a 2nd time) |
||
*[[Ark Pentasphere]] |
*[[Ark Pentasphere]] |
||
*[[Moonlight ore]] (Only needed to do the quest a 2nd time) |
|||
|Level= |
|Level= |
||
|Repeatable=Yes |
|Repeatable=Yes |
||
| Line 23: | Line 15: | ||
|Next=[[Zilart Mission 15]] |
|Next=[[Zilart Mission 15]] |
||
|Title= Pentacide Perpetrator |
|Title= Pentacide Perpetrator |
||
|Reward=[[Shard of Apathy]]<br>[[Shard of Arrogance]]<br>[[Shard of Cowardice]]<br>[[Shard of Envy]]<br>[[Shard of Rage]]<br>'''One of the following:''' |
|||
|Reward=*[[Abyssal Earring]] |
|||
:{{imgpop|[[File:Abyssal Earring icon.png]]|Abyssal Earring description.png|link=Abyssal Earring}} {{imgpop|[[Abyssal Earring]]|Abyssal Earring description.png|link=Abyssal Earring}} |
|||
*or [[Beastly Earring]] |
|||
:{{imgpop|[[File:Beastly Earring icon.png]]|Beastly Earring description.png|link=Beastly Earring}} {{imgpop|[[Beastly Earring]]|Beastly Earring description.png|link=Beastly Earring}} |
|||
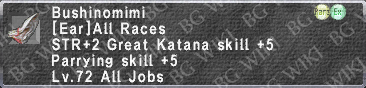
*or [[Bushinomimi]] |
|||
:{{imgpop|[[File:Bushinomimi icon.png]]|Bushinomimi description.png|link=Bushinomimi}} {{imgpop|[[Bushinomimi]]|Bushinomimi description.png|link=Bushinomimi}} |
|||
*or [[Knight's Earring]] |
|||
:{{imgpop|[[File:Knight's Earring icon.png]]|Knight's Earring description.png|link=Knight's Earring}} {{imgpop|[[Knight's Earring]]|Knight's Earring description.png|link=Knight's Earring}} |
|||
*or [[Suppanomimi]] |
|||
:{{imgpop|[[File:Suppanomimi icon.png]]|Suppanomimi description.png|link=Suppanomimi}} {{imgpop|[[Suppanomimi]]|Suppanomimi description.png|link=Suppanomimi}} |
|||
|Image={{PAGENAME}}.jpg |
|Image={{PAGENAME}}.jpg |
||
}} |
}} |
||
<br /> |
|||
== Walkthrough == |
== Walkthrough == |
||
| ⚫ | |||
{{Color|red|Note}}: |
|||
<p style="text-align:center; color:red;">'''!!!NOTE:!!!''' You must flag this quest at the blank target in [[The Shrine of Ru'Avitau]] or you WILL NOT receive credit and will have to re-aquire another [[Ark Pentasphere]]. |
|||
| ⚫ | |||
<br> |
|||
====Preparation==== |
====Preparation==== |
||
*Enter [[The Shrine of Ru'Avitau]] from the (H-9) entrance in [[Ru'Aun Gardens]]. |
*Enter [[The Shrine of Ru'Avitau]] from the (H-9) entrance in [[Ru'Aun Gardens]]. |
||
**[[Survival Guide]] puts you on the path to it, if you have it. |
|||
**[[Home Point]] #5 is another fast alternative. |
|||
*Head North a short distance to find a Blank Target at (G/H-11). |
*Head North a short distance to find a Blank Target at (G/H-11). |
||
*Examine the |
*Examine the Blank Target for a cutscene. |
||
*Examine the Blank Target '''''again''''' for dialogue about how to obtain an [[Ark Pentasphere]]. |
|||
**[[Divine Might]] now appears in your Outlands Quests log. |
|||
*You, or someone in your group, will need to obtain an [[Ark Pentasphere]]. |
*You, or someone in your group, will need to obtain an [[Ark Pentasphere]]. |
||
**[[Ark Pentasphere]]s are created by trading 1 [[Illuminink]] and 1 [[Parchment]] to the Qu'Hau Spring at (H-6) in [[Ro'Maeve]] during a full moon |
**[[Ark Pentasphere]]s are created by trading 1 [[Illuminink]] and 1 [[Parchment]] to the Qu'Hau Spring at (H-6) in [[Ro'Maeve]] during a full moon and between 18:00 and 06:00 game time. |
||
**[[Illuminink]] drops off [[Cursed Puppet]] and [[Magic Flagon]] in [[Ro'Maeve]]. |
**[[Illuminink]] drops off [[Cursed Puppet]] and [[Magic Flagon]] in [[Ro'Maeve]]. |
||
*Trade the [[Ark Pentasphere]] to any of the '''Shimmering |
*Trade the [[Ark Pentasphere]] to any of the '''Shimmering Circles''' in [[La'Loff Amphitheater]] to access the battlefield. |
||
====Battle==== |
====Battle==== |
||
*This battle has a 30 minute time limit and allows for a full alliance of 18 people will be allowed to enter. |
*This battle has a 30 minute time limit and allows for a full alliance of 18 people will be allowed to enter. |
||
**This battle was initially uncapped at level 75 and was relatively challenging. Level 99 players should have little to no difficulty completing this. |
|||
*You will need to defeat [[Ark Angel MR]], [[Ark Angel TT]], [[Ark Angel EV]], [[Ark Angel HM]], and [[Ark Angel GK]] in order to win. |
*You will need to defeat [[Ark Angel MR]], [[Ark Angel TT]], [[Ark Angel EV]], [[Ark Angel HM]], and [[Ark Angel GK]] in order to win. |
||
| ⚫ | |||
*Most party set ups (Short of 18 [[Black Mage]]s) will find it very difficult to defeat all 5 of the Ark Angels before the alliance wipes. You should expect a full alliance wipe at least once. |
|||
| ⚫ | |||
| ⚫ | |||
| ⚫ | |||
**If you feel like you're about to die, try to move out of the center of the arena. People left in the center of the arena are often near impossible to raise again without getting aggro. |
**If you feel like you're about to die, try to move out of the center of the arena. People left in the center of the arena are often near impossible to raise again without getting aggro. |
||
*If you happen to have an alliance wipe, re-raise, heal, and then finish off whoever remains. |
*If you happen to have an alliance wipe, re-raise, heal, and then finish off whoever remains. |
||
*The general strategy |
*The general strategy at level 75 was to divide and conquer. Have one tank/kiter on each mob, while the rest of the group kills the others one by one. |
||
*The typical kill order is [[Ark Angel TT]] > [[Ark Angel MR]] > [[Ark Angel GK]] > [[Ark Angel HM]] > [[Ark Angel EV]]. |
|||
**Make sure someone is keeping the pets slept at all times. They can cause chaos if left alone for too long. |
**Make sure someone is keeping the pets slept at all times. They can cause chaos if left alone for too long. |
||
**The [[Ark Angel TT]] should be |
**The [[Ark Angel TT]] should be defeated as fast as possible because he has access to wide selection of nasty spells. |
||
**Along with having a pet, the [[Ark Angel MR]] will also charm at least one player before she falls. |
**Along with having a pet, the [[Ark Angel MR]] will also charm at least one player before she falls. |
||
***[[Fealty]], light elemental resistance equipment, and magic evasion in general are effective at resisting this. |
|||
**Every time the [[Ark Angel GK]] uses [[Meikyo Shisui]], he will try to make a Light Skill Chain. This can be prevented if [[utsusemi]] absorbs any of the [[WS]]. |
|||
** |
**Every time the [[Ark Angel GK]] uses [[Meikyo Shisui]], it will try to make a Light Skill Chain. This can be prevented if [[utsusemi]] absorbs any of the weaponskills. |
||
**When fighting the [[Ark Angel HM]] it is recommended to have as many people out of [[Mijin Gakure]] range as possible. This should not be a problem for players in 99 [[item level|ilvl]] equipment. |
|||
***[[Barfira]] does '''not''' reduce [[Mijin Gakure]] damage. |
|||
**The [[Ark Angel EV]] [[Spirits Within]] is very strong and can take out someone in just one hit. |
**The [[Ark Angel EV]] [[Spirits Within]] is very strong and can take out someone in just one hit. |
||
*Once you have finished the battle, return to the Blank Target in [[The Shrine of Ru'Avitau]] to choose your reward. |
*Once you have finished the battle, return to the Blank Target in [[The Shrine of Ru'Avitau]] to choose your reward. |
||
====Re-Questing==== |
====Re-Questing==== |
||
| ⚫ | |||
*You must first drop whatever earring you chose last time. |
|||
* Drop your current earring. |
|||
| ⚫ | |||
* Receive the quest at the unmarked target (G/H-11) in the main entrance of The Shrine of Ru'Avitau. |
|||
| ⚫ | |||
* The quest appears as a second Divine Might quest in your quest log with a different description. |
|||
*Once you have the Key Item, you will be able to re do the fight. |
|||
* Obtain a [[Light Ore]]. |
|||
*You will also need to get another [[Ark Pentasphere]]. |
|||
* If you need a new [[Ark Pentasphere]], obtain an [[Illuminink]] and [[Parchment]] as well. |
|||
| ⚫ | |||
** Warning: if you need both the {{KeyItem}}[[Moonlight ore]] and the [[Ark Pentasphere]], you must make TWO separate trades. |
|||
{{Color|red|Note}}: |
|||
** If all three items are traded, only the {{KeyItem}}[[Moonlight ore]] will be obtained. |
|||
| ⚫ | |||
** Each individual restarting this quest must possess their own {{KeyItem}}[[Moonlight ore]]. |
|||
* Trade the [[Illuminink]] and [[Parchment]] to the Qu'Hau Spring in [[Ro'Maeve]] during a Full Moon between 18:00 and 6:00 to obtain an [[Ark Pentasphere]]. |
|||
| ⚫ | |||
** Only one alliance member needs the [[Ark Pentasphere]] to initiate the battle. |
|||
* Enter and complete the Divine Might battlefield at [[La'Loff Amphitheater]]. |
|||
| ⚫ | |||
==Notes== |
|||
* Prior to the [[June_2016_Version_Update_Changes|June 2016 Version Update]], a player would have to trade their items for an [[Ark Pentasphere]] or {{KeyItem}}[[Moonlight ore]] on a clear night during the full moon from midnight to 3:00 a.m. This was eased along with a batch of other older quest requirements. |
|||
| ⚫ | |||
Latest revision as of 13:17, 8 December 2023
| Divine Might | |
|---|---|
| Required Fame | Outlands Fame Level: Unknown |
| Level Restriction: | None |
| Starting NPC | Yve'noile, The Shrine of Ru'Avitau |
| Pack | Rise of the Zilart |
| Title | Pentacide Perpetrator |
| Repeatable | Yes |
| Description | Use the Ark Pentasphere at the La'Loff Amphitheater to confront and defeat all five Crystal Warriors simultaneously. |
| Previous Quest | Next Quest |
|---|---|
| Zilart Mission 13 | Zilart Mission 15 |
| Requirements | |
Zilart Mission 13 complete
| |
| Rewards | |
| Shard of Apathy Shard of Arrogance Shard of Cowardice Shard of Envy Shard of Rage One of the following: | |


Walkthrough
Note: If you complete this quest, Zilart Mission 14, will be considered completed as well.
!!!NOTE:!!! You must flag this quest at the blank target in The Shrine of Ru'Avitau or you WILL NOT receive credit and will have to re-aquire another Ark Pentasphere.
Preparation
- Enter The Shrine of Ru'Avitau from the (H-9) entrance in Ru'Aun Gardens.
- Survival Guide puts you on the path to it, if you have it.
- Home Point #5 is another fast alternative.
- Head North a short distance to find a Blank Target at (G/H-11).
- Examine the Blank Target for a cutscene.
- Examine the Blank Target again for dialogue about how to obtain an Ark Pentasphere.
- Divine Might now appears in your Outlands Quests log.
- You, or someone in your group, will need to obtain an Ark Pentasphere.
- Ark Pentaspheres are created by trading 1 Illuminink and 1 Parchment to the Qu'Hau Spring at (H-6) in Ro'Maeve during a full moon and between 18:00 and 06:00 game time.
- Illuminink drops off Cursed Puppet and Magic Flagon in Ro'Maeve.
- Trade the Ark Pentasphere to any of the Shimmering Circles in La'Loff Amphitheater to access the battlefield.
Battle
- This battle has a 30 minute time limit and allows for a full alliance of 18 people will be allowed to enter.
- This battle was initially uncapped at level 75 and was relatively challenging. Level 99 players should have little to no difficulty completing this.
- You will need to defeat Ark Angel MR, Ark Angel TT, Ark Angel EV, Ark Angel HM, and Ark Angel GK in order to win.
- Everyone should bring some form of re-raise in order to minimize down time.
- The Ark Angels share alliance hate, so people should wait to re-raise until the entire alliance is down and the mobs are back at their starting position.
- If you feel like you're about to die, try to move out of the center of the arena. People left in the center of the arena are often near impossible to raise again without getting aggro.
- If you happen to have an alliance wipe, re-raise, heal, and then finish off whoever remains.
- The general strategy at level 75 was to divide and conquer. Have one tank/kiter on each mob, while the rest of the group kills the others one by one.
- Make sure someone is keeping the pets slept at all times. They can cause chaos if left alone for too long.
- The Ark Angel TT should be defeated as fast as possible because he has access to wide selection of nasty spells.
- Along with having a pet, the Ark Angel MR will also charm at least one player before she falls.
- Fealty, light elemental resistance equipment, and magic evasion in general are effective at resisting this.
- Every time the Ark Angel GK uses Meikyo Shisui, it will try to make a Light Skill Chain. This can be prevented if utsusemi absorbs any of the weaponskills.
- When fighting the Ark Angel HM it is recommended to have as many people out of Mijin Gakure range as possible. This should not be a problem for players in 99 ilvl equipment.
- Barfira does not reduce Mijin Gakure damage.
- The Ark Angel EV Spirits Within is very strong and can take out someone in just one hit.
- Once you have finished the battle, return to the Blank Target in The Shrine of Ru'Avitau to choose your reward.
Re-Questing
Note: You are only allowed to re-quest this once per Conquest Tally.
- Drop your current earring.
- Receive the quest at the unmarked target (G/H-11) in the main entrance of The Shrine of Ru'Avitau.
- The quest appears as a second Divine Might quest in your quest log with a different description.
- Obtain a Light Ore.
- If you need a new Ark Pentasphere, obtain an Illuminink and Parchment as well.
- Trade the Light Ore to the Qu'Hau Spring in Ro'Maeve during a Full Moon between 18:00 and 6:00 to receive the
 Moonlight ore.
- Warning: if you need both the Moonlight ore and the Ark Pentasphere, you must make TWO separate trades.
- If all three items are traded, only the Moonlight ore will be obtained.
- Each individual restarting this quest must possess their own Moonlight ore.
- Warning: if you need both the
- Trade the Illuminink and Parchment to the Qu'Hau Spring in Ro'Maeve during a Full Moon between 18:00 and 6:00 to obtain an Ark Pentasphere.
- Only one alliance member needs the Ark Pentasphere to initiate the battle.
- Enter and complete the Divine Might battlefield at La'Loff Amphitheater.
- Return to the unmarked target in The Shrine of Ru'Avitau to pick up a new earring.
Notes
- Prior to the June 2016 Version Update, a player would have to trade their items for an Ark Pentasphere or Moonlight ore on a clear night during the full moon from midnight to 3:00 a.m. This was eased along with a batch of other older quest requirements.
